It has been a while – I left this blog untouched since,,, but I am back now.
I have been teaching privately in London but in this situation, us get together is impossible. Some are just started pointed pen calligraphy, then I thought if I can show some how-to here, they might be able to carry on by themselves at home.
個人的にロンドンで何人かにカリグラフィーを教えてきましたが、この状況で多人数で集まるのが無理になりました。始めたばっかりの方もいるので、そういう人たちが時間があるうちに、家で自主練できるようにビデオでも配ろうかと考えて、ここに載せることにします。
I will start introducing equipment you will need. まずはお道具。
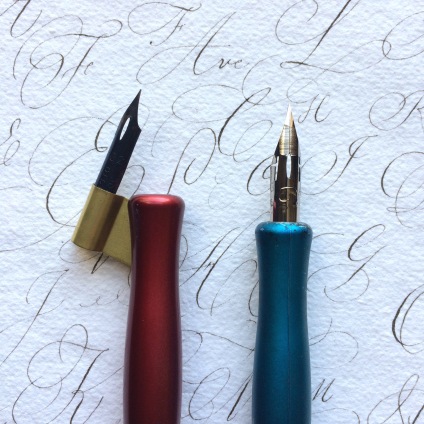
PEN NIBS ペン先

Any pointed pen nibs okay. You will find out which is your favorite as you go.
I use Gillot 303 (top middle) a lot, also 290 (top and bottom left)
Brause 66 EF for large size, (top right)
or Zebra G pen (bottom right).
Their hardness, flexibility and feelings are all different and people have their own taste. Some people like Leonardo Principal, 41, post office pens or Esterbrook 356 / 357.
ホルダーにしっかりフィットして書けるならなんのペンでも良いです。私は
Gillot 303 (上列真ん中)、290 (上列左、及び下の左)をよく使います。
ブラウゼ 66EF (上列右)、大きい字が書きやすいです。それとゼブラの G ペン(下の右)など。硬さ、しなやかさ、感触は全て異なります。書いていくうちにご自分のお好きなのを見つけてください。書く紙の表面でも違います。レオナルドのプリンシパル、同じく41、エスターブルックを好む人もいます。
PEN HOLDER ペン・ホルダー
Lots are okay to fit into normal pen holders if you have one already. If not, Speedball ones are versatile. Straight or oblique – this is the another thing you can choose your favorite. I use straight one.
多くのペン先は普通のペンホルダーにはまります。もしお手持ちでなければ、スピードボールのが幅広く合いやすい気がしますが、なんでもいいです。横にひじがついてるオブリークのペンホルダーを使う方もいます。私は普通ので書いています。
Difference is the angle that you can make. 違いは書く時の角度。
Using oblique pen holder, you do not need to twist your wrist to make your pen nib parallel to the slant angle,
オブリークのペンホルダーで書く場合、手首をひねったり紙を斜めにしたりあまりせずに、字の傾きと平行にペン先を持っていくことができます。
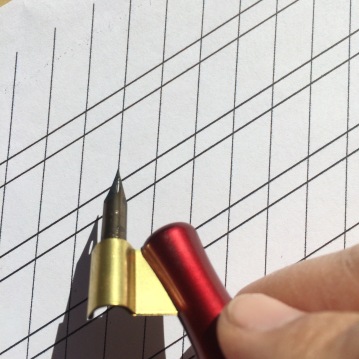
while with straight pen holder, you might need to tilt your paper more to make pen and slant parallel.
普通のペンホルダーの場合、ペン先と字の傾きを平行にしたかったら、手首を内側にぐっと入れ込むか、紙を斜めに置く必要があります。

Either way, Stick your pen nibs facing up, towards your face.
どの場合でも、ペン先は上(自分の顔の方)を向いていること。空気穴みたいなのが真上を向いていてください。
INK インク
I use stick ink for black. If I need colours, I usually go to gouache. Or just for practice you can use Higgins ink.
私は墨をすります。(墨汁はおすすめしません)
色が要る場合はガッシュを使います。練習だけならヒギンズのインクで。でもちゃんとした黒じゃないので、作品作る時には適しません。あくまでも練習用!

But this is not black enough if you want to make a proper piece. Just for practice!
PAPER 紙
Ideally you use good quality printing paper for proper piece, but for practice, any paper is okay if it does not breed or break with ink. Maker Pad, Layout Pad are okay. Ryman’s re-fill pad is cheap option.
作品を書く際は良質のプリント用の紙が良いですが、練習用紙はインクがしみない様なら何でもいいです。マーカーパッドなど。
Guide ガイド
We do not need to worry about any ‘X-height’ for any pointed pen script. Maybe you start large-ish size to practice and go down, but better to see the details at first. Slant is normally 50 – 55 degrees. You can make one by your self or download one if you can find any online.
ポインテッドペンの場合は、幅広ペンで設定していた X height を気にせず、どのサイズでも書いてOK ですが、最初は大きめに書くと詳細が見やすい。慣れたら小さく書けば良いです。字の傾きは通常 50-55度。ご自分で線を引いて作るなり、オンラインで見つけることができるならそれでも良し。
Now you set to start to make lines! これで線を書く準備ができました。
You can buy online some of all on this page at Scribblers. ここでご紹介したいくつかの物は スクリブラーズというお店でオンラインで買えます。
