When you can do curve at the bottom, next vital movement you need to master is the curve at the top.
下のカーブがキレイに出来るようになったら、
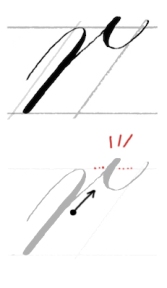
次は上のカーブです。とても大事なペンの動きです。

Slowly going up to the top and curve with no pressure,
when you finish the U curve, start add the pressure,
firm stop at the bottom.
ゆっくり下から上の線まで上がって、筆圧なしで曲がり、
U カーブが終わってから、筆圧を加え、
下の線でしっかり止まります。

Make mirror image of S, by adding the curve at the bottom.
Make sure your top and bottom lines are thin.
Smooth increasing, decreasing of the thickness of the line is the key.
Try not to finish at the bottom – go up towards the middle point of the letter height.
前回やった下のカーブを加えることで、S の鏡文字のような形を作ります。
頭とお尻のカーブは細い線であるように。
筆圧のかけるところ、抜くところをスムーズに。
下で終わらず、字の高さの半ばくらいまで、細い線を持ち上げて終わります。

この動きで書けるのが、n m r v です。
You can make lower case n, m, r, and v.

Combine the first movement you just did and the second, this makes n.
Make this twice, you will have m.
いまやった最初の動きと2番目の動きを合わせると n になります。
二回、山を作ったら m です。
Adding the ‘baby’ i movement, after the first movement, you will have this version of r.
‘Baby’ i is slightly above your top line.
最初の動きの後に、小さい i を付けると、このバージョンの r になります。
小さい i の上部分は、ガイドの上の線から少し出ます。

Second movement plus ‘baby’ i makes v.
Bottom point is a curve, not pointy, as your computer font.
2番目の動きに、小さい i を合わせると v になります。
コンピューターの字のように、下が尖らずに、カーブで上に上がってきます。
だいぶ小文字が書けるようになってきました!
次は o のグループです。
Next up is the friends of letter o.
